
Changer le pointeur de la souris dans Windows 7 - voici comment
Lisez cette astuce pratique sur la façon de modifier le pointeur de votre souris dans Windows 7.
Modifier visuellement le pointeur de la souris dans Windows 7
- Cliquez sur l'icône "Démarrer" ou "Windows" puis sur "Panneau de configuration".
- Sélectionnez maintenant la catégorie "Matériel et sons".
- Sous "Périphériques et imprimantes", cliquez sur "Souris" pour ouvrir les paramètres de la souris.
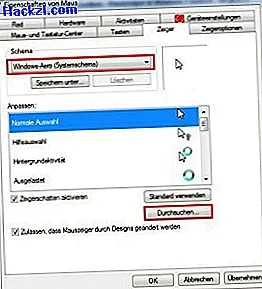
- Une fenêtre intitulée "Propriétés de la souris" s'ouvre. Accédez à l'onglet "Pointeurs" ci-dessus.
- Sous "Scheme", vous pouvez essentiellement changer l'apparence du pointeur de la souris. Par exemple, le pointeur de la souris peut être agrandi en sélectionnant, par exemple, le schéma "Windows Aero (grand) (schéma système)".
- Dans le menu déroulant de "Personnaliser:", vous pouvez changer le pointeur de la souris pour chaque commande. Pour ce faire, cliquez d'abord sur la commande puis sur "Parcourir ..." et sélectionnez le pointeur souhaité en cliquant sur "OK".
- Enregistrez les modifications en cliquant sur "Appliquer".
- Cliquez sur "Utiliser par défaut", réinitialisez toutes les modifications apportées aux paramètres d'origine.
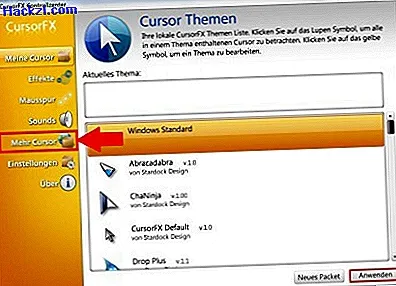
"CursorFX" donne encore plus de peps à votre pointeur de souris
Avec l'outil gratuit "CursorFX", vous pouvez facilement télécharger de nouveaux pointeurs de souris et les activer directement dans le programme.
- Installez le programme "CursorFX" et démarrez-le après l'installation.
- Les pointeurs de souris déjà installés sont affichés dans "Mes curseurs". En cliquant sur "More Cursors", vous pouvez télécharger des pointeurs de souris plus intéressants à partir de la page développeur.
- En cliquant sur "Appliquer", vous changez le pointeur de la souris.
Lisez ici comment changer l'arrière-plan de votre bureau.